Create an API Key (Token)
Follow the actual MoleAPI console flow to create your first API Key
In MoleAPI, an API Key is also commonly referred to as a token. It serves as your identity credential when calling APIs and usually appears in the form of sk-....
Once created, you can use it in Chatbox, NextChat, Immersive Translate, the OpenAI SDK, or any other tool that supports custom OpenAI-compatible APIs.
Concept clarification: API Key vs text billing unit
Please note the difference between these two commonly confused concepts:
- API Key / Token: The identity credential used to access APIs.
- Text billing unit (Token): The billing unit used when a model processes text.
What you need before creating one
Before you start, it is recommended to confirm the following:
- Your account is already registered and you can log in to the MoleAPI console.
- Your account has available balance, or at least the free trial quota for new users.
- You already know what this Key will be used for, for example:
- Daily testing
- Local development
- A production project
- A standalone application within your team
Step 1: Go to the KEY Management page
After logging in, go to the KEY Management page from the left sidebar in the console:
- Path:
Console → KEY Management - Direct link: https://home.moleapi.com/console/token
After entering the page, click Add Token at the top.
Step 2: Fill out the creation form
After clicking, the Create New Token dialog will appear. The image below is based on the actual MoleAPI console interface:
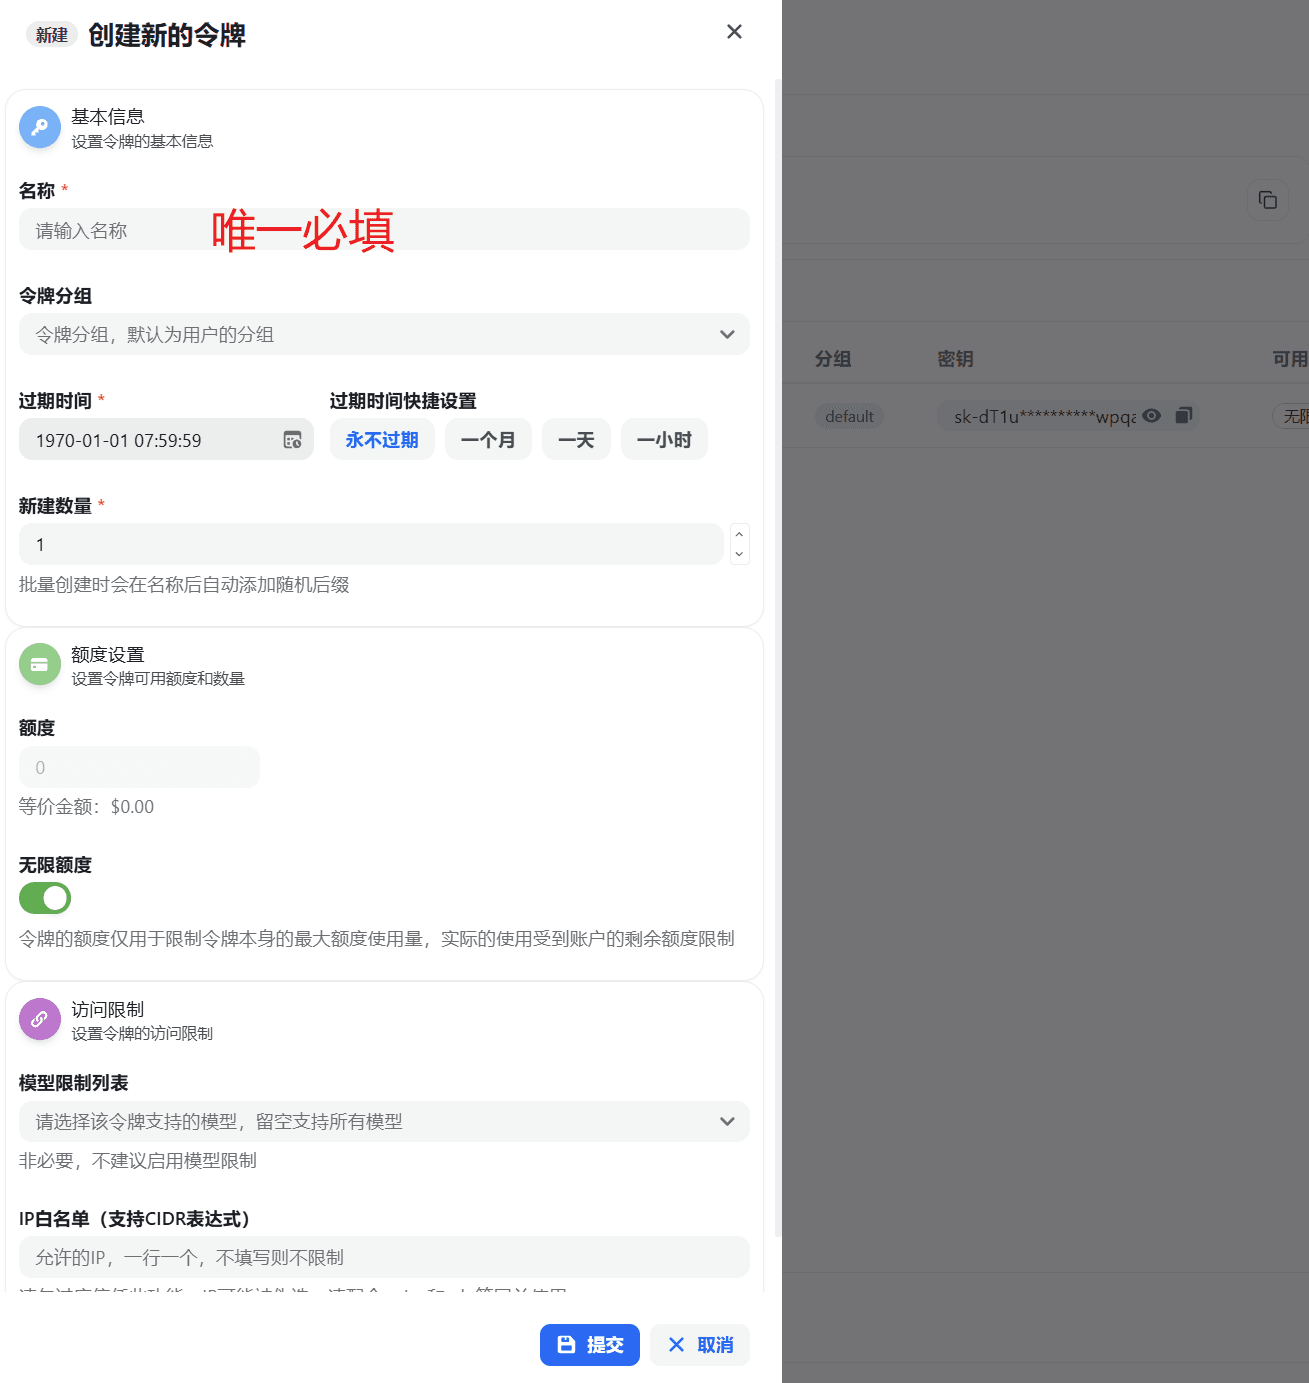
If you just want to create the Key first and do not want to understand every field all at once, you can focus on the 4 items that matter most:
- Name: helps you identify its purpose later
- Token group: determines which model group this Key uses
- Expiration time: determines how long this Key remains valid
- Model restrictions: if you are unsure, you can leave this unrestricted the first time
Below is an explanation of each item in that order.
1) Name (required)
This is the label you assign to the Key for your own reference, so you can distinguish different uses.
Recommended naming examples:
dev-localchatbox-testnextchat-prodopenclaw-docs
It is recommended to use clear, self-explanatory names so it is easier to locate later in usage logs, Key management, and quota controls.
2) Token group
This determines which group the token will use.
Groups usually affect:
- Available model range
- Pricing strategy
- Channel stability or provider source
If this is your first time creating one, you can use the default group first. Once you are more familiar with the platform, you can switch to a more suitable group based on pricing, model availability, and business needs.
3) Expiration time (required)
MoleAPI supports manually selecting an expiration time and also provides several quick options:
Never expiresOne monthOne dayOne hour
How to choose:
- Temporary testing:
One dayorOne houris recommended - Local development:
One monthis recommended - Long-term stable services: you can choose
Never expires, but use it together with Quota and security policies
For beginners, if you just want to get the API working first, it is recommended to create a short-lived Key first. After confirming everything works, create a formal Key.
4) Quantity to create (required)
The default is 1, meaning only one token will be created.
If you want to distribute separate Keys to multiple environments or team members at once, you can create them in batches. When creating in batches, the system appends a random suffix to the name to make them easier to distinguish.
If this is your first time using it, just keep it at 1.
5) Quota
This sets the maximum available Quota for a single token.
Please note:
- This is the token's own Quota limit, not your account's total balance.
- Even if you set a high limit here, actual usage is still constrained by your remaining account balance.
If you want this Key to be used only for small-scale testing, you can set a low Quota to avoid accidental misuse.
6) Unlimited quota
This is usually enabled by default.
When enabled, the token itself has no separate Quota limit and is only constrained by your account balance.
A practical way to think about it:
- Temporary test Keys: you can disable unlimited quota and set a small Quota
- Production service Keys: whether to enable it depends on your risk control strategy
If you are sensitive to risk control, it is recommended not to enable unlimited quota for every Key.
7) Model restriction list
Here you can restrict which models this Key is allowed to call.
If you do not set restrictions, it usually means the Key can call all models allowed under the current group.
Recommended practices:
- Testing: leave it unrestricted first for easier exploration
- Production projects: allow only the models your business actually needs
- Team collaboration: use different Keys for different systems and restrict the model scope
Benefits of doing this:
- Avoid accidentally calling expensive models
- Reduce risk caused by overly broad permissions
- Make it easier to troubleshoot logs and identify cost sources
8) IP whitelist
Here you can enter the IPs allowed to access this Key. CIDR expressions are supported.
If you leave it blank, source IPs are unrestricted by default.
IP whitelisting is a good fit for scenarios such as:
- Server-side deployments on fixed servers
- A company with a fixed outbound IP
- You want a production Key to be callable only from a specific environment
If you are still in local debugging and do not have a fixed outbound IP, you can leave it blank for now and add it later.
Step 3: Submit and copy the API Key
After confirming everything, click Submit in the lower-right corner.
Once created successfully, you will see the new token in the KEY Management list. Next, make sure to do these two things immediately:
- Copy the full API Key
- Save it in a secure location, such as:
- A local password manager
- Environment variables
- A server-side secret management system
Do not expose your Key in these places
- Do not put it in frontend source code
- Do not commit it to code repositories such as GitHub or Gitee
- Do not post it in group chats, support ticket screenshots, or public documentation
Recommended configuration for beginners
If you just want to get started with MoleAPI quickly, create it like this first:
- Name:
dev-local - Token group: Default group
- Expiration time: One month
- Quantity to create: 1
- Quota: Enter a test Quota you are comfortable with, or enable unlimited quota first
- Model restrictions: Leave unrestricted for now
- IP whitelist: Leave blank for now
This setup is the easiest to get working, and you can gradually tighten permissions later.
What to do next after creating it
After getting your API Key, you usually still need two pieces of information before you can actually start making calls:
- Base URL:
https://api.moleapi.com/v1 - API Key: the
sk-...you just created
Recommended next reads:
FAQ
Why did I create a Key but API calls still fail?
Common causes include:
- The Base URL is incorrect, and
/v1was omitted - The model name is incorrect
- Insufficient account balance
- The model is not supported under the token group
- The token has model restrictions or IP restrictions configured
Can one account create multiple API Keys?
Yes. It is recommended to split Keys by purpose instead of sharing one Key across all projects.
Should testing and production share the same Key?
Not recommended. A better approach is:
- One test Key
- One production Key
- Further split by project if needed
This is safer and also makes cost control and troubleshooting easier.
How is this guide?
Last updated on