Codex Extension in VS Code
Install the Codex extension in VS Code and configure Mole API as the model provider to chat with Codex directly in the editor.
Also applies to Codex App
The Codex extension in VS Code is used as the example below, but the same configuration also applies to the standalone Codex application (Codex App): in the App, choose API Key, enter your Mole API key, and open config.toml in settings to add the moleapi model provider.
Use Cases
- You write code in VS Code and want to use Codex for chat and AI capabilities.
- You want to use Mole API as the model access point for Codex, so you can manage usage and keys in one place.
Prerequisites
- You have already obtained your API Key from the Mole API Console (generate and copy it from the Personal Center or Token Management page).
- VS Code is already installed and working properly.
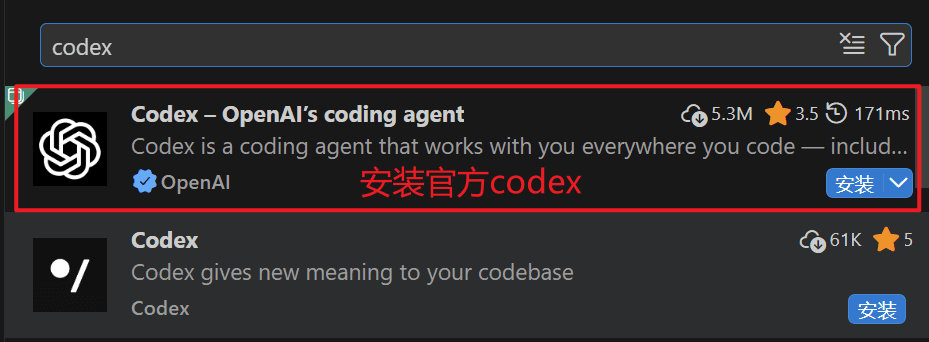
Step 1: Install the Codex Extension in VS Code
- Open VS Code, then press
Ctrl+Shift+X(Windows/Linux) orCmd+Shift+X(macOS) to open the Extensions view. - Enter Codex in the search box.
- Find the Codex extension and click Install.
After installation, if the extension does not appear, try restarting VS Code or use the Command Palette (Ctrl+Shift+P / Cmd+Shift+P) to run Developer: Reload Window.
Step 2: Choose the API Key Method in Codex and Enter Your Key
- Open the Codex panel in VS Code (from the sidebar or the Command Palette).
- Choose the API Key method for sign-in/authentication.
- Enter the API Key you obtained from the Mole API Console.

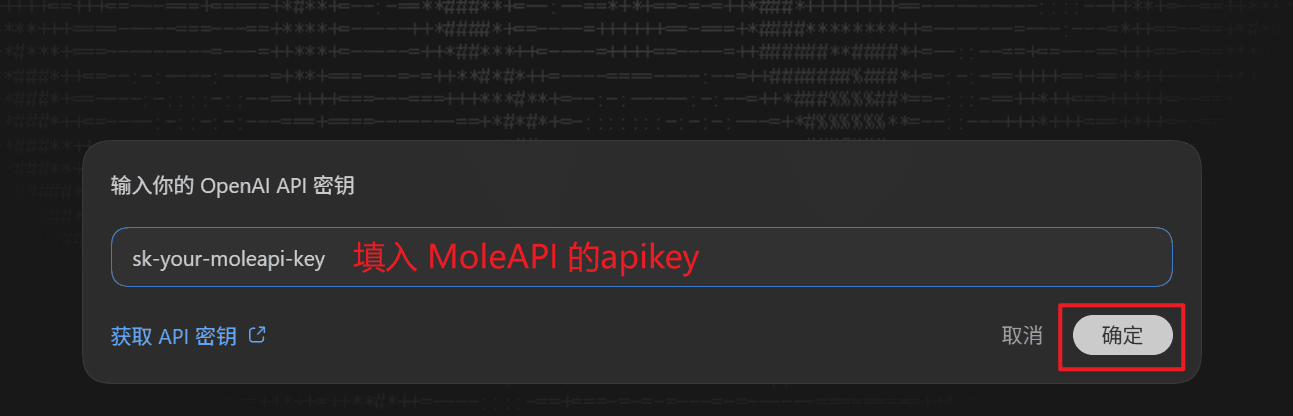
At this point, you have only entered the key. To make Codex actually send requests through Mole API, you still need to specify the model provider in the configuration.
Step 3: Open config.toml and Configure Mole API
- In the Codex panel, click the settings button in the upper-right corner.
- In settings, go to: Codex Settings → Open config.toml.
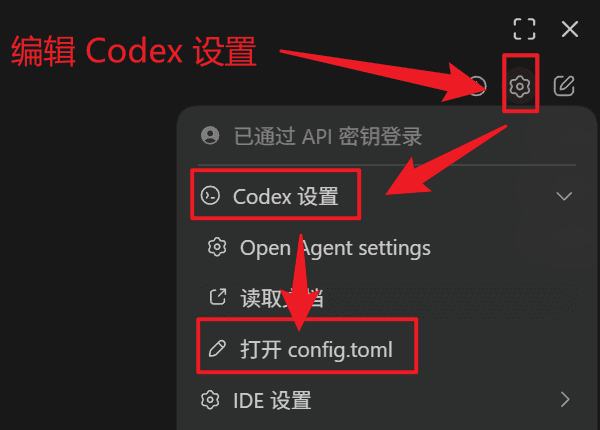
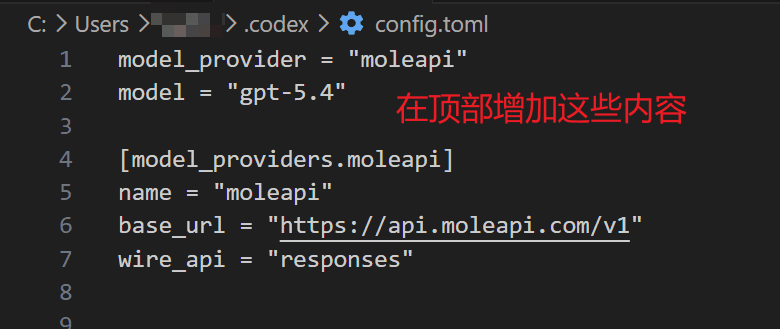
- Add the following content to the opened
config.toml:
model_provider = "moleapi"

[model_providers.moleapi]
name = "moleapi"
base_url = "https://api.moleapi.com/v1"
wire_api = "responses"
You can also add model = "the Mole API model you want to use, for example claude-opus-4-6".
- Save
config.tomland close it. - Restart VS Code to apply the configuration.
Step 4: Verify That the Configuration Worked
- Open Codex again and send a message in the input box (for example, "Hello").
- If Codex responds normally, and you can see the request record for the corresponding API Key in the request logs of the Mole API Console, then Mole API has been successfully configured as the model provider for Codex.
FAQ
No response or an error when sending a message
- Make sure
model_provider = "moleapi"and[model_providers.moleapi]are correctly configured inconfig.toml, and that the file has been saved. - Make sure base_url is
https://api.moleapi.com/v1. Do not omit/v1or add extra path segments. - Make sure the API Key you entered matches the one in the Mole API Console and has not expired. After changing the configuration, you must restart VS Code.
Want to switch models or endpoints
You can manage available models and usage in the Mole API Console. If you need to switch endpoints or providers on the Codex side, update model_provider and the corresponding [model_providers.*] configuration in config.toml, then restart VS Code.
Reference Links
How is this guide?
Last updated on
Claude Code Extension in VS Code
Install the Claude Code extension in VS Code and connect it to Mole API. Starting with Claude Code 2.0, third-party APIs are officially blocked. This tutorial is the first of its kind online.
OpenAI Codex CLI
OpenAI Codex CLI installation guide — install a terminal-based AI coding assistant on Windows, macOS, and Linux, connected to New API. Supports sandbox policies and atomic patch editing.