Claude Code Extension in VS Code
Install the Claude Code extension in VS Code and connect it to Mole API. Starting with Claude Code 2.0, third-party APIs are officially blocked. This tutorial is the first of its kind online.
First of Its Kind Online
Starting with Claude Code 2.0, the official documentation and entry points for third-party APIs have been blocked. Tutorials for connecting proxy/intermediary APIs such as Mole API inside the VS Code extension are almost impossible to find on the Chinese internet. This article is the first of its kind online: a step-by-step guide to installing the Claude Code extension in VS Code and configuring it to use Mole API, so you can get a third-party API experience inside the editor that matches the terminal version.
Use Cases
- You primarily write code in VS Code and want to use Claude Code's graphical interface features, such as sidebar chat, inline diff, and
@file references, instead of working only in the terminal. - You want to use Mole API as the access point for Claude, rather than connecting directly through the official route or using only the officially listed third parties such as Bedrock, Vertex, or Foundry.
Prerequisites
- VS Code 1.98.0 or later. You can check this in VS Code under Help → About.
- You have already obtained your API Key from the Mole API Console by generating and copying it from the personal center or token management page.
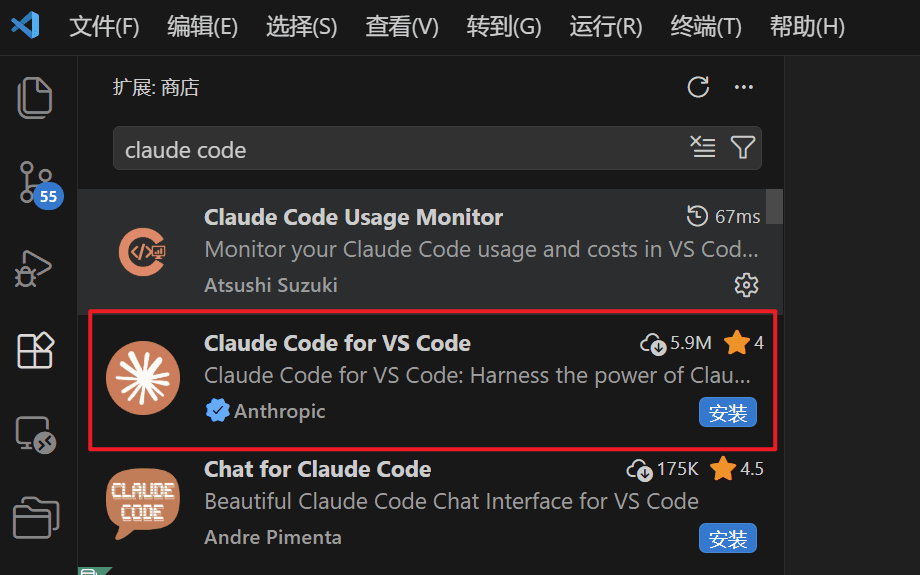
Step 1: Install the Claude Code Extension in VS Code
- Open VS Code, then press
Ctrl+Shift+X(Windows/Linux) orCmd+Shift+X(macOS) to open the Extensions view. - Enter Claude Code in the search box.
- Find the Claude Code extension published by Anthropic, then click Install.
After installation, if the extension does not appear, try restarting VS Code or open the Command Palette (Ctrl+Shift+P / Cmd+Shift+P) and run Developer: Reload Window.
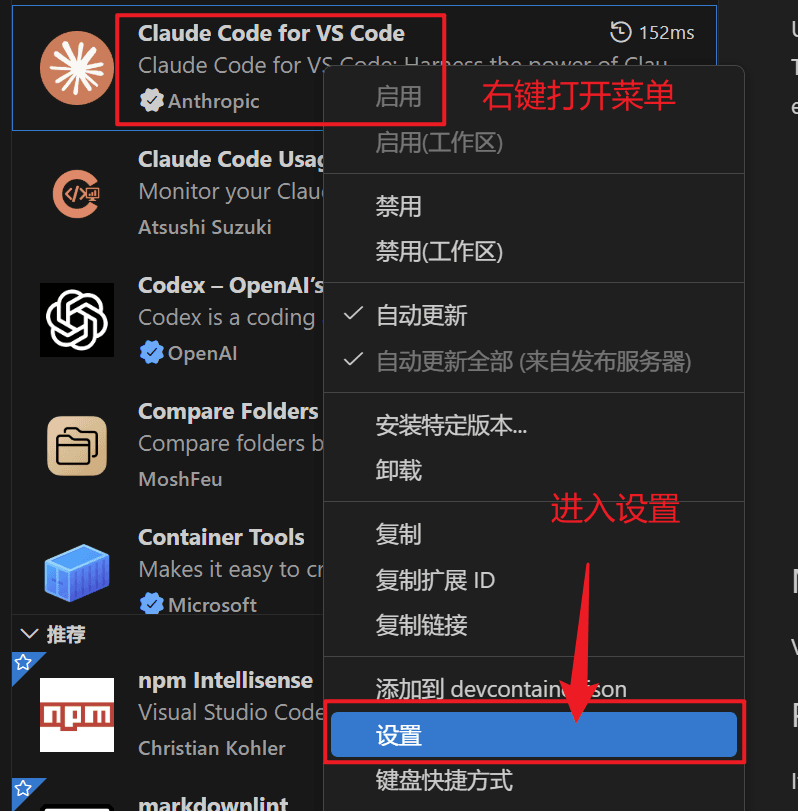
Step 2: Complete the Configuration in Claude Code Extension Settings (Important)
Before using Mole API, you must first complete the following settings in the Claude Code extension. Otherwise, a login prompt may appear or the extension may fail to use the third-party API.
Open Claude Code Extension Settings
Open VS Code Settings with Ctrl+, (Windows/Linux) or Cmd+, (macOS), then select Extensions → Claude Code on the left, or search directly for Claude Code.
1. Enable Hide Onboarding to Prevent the Login Screen
Find Hide Onboarding in the settings and enable it. This prevents the official login screen from appearing during use.

2. Set Selected Model
Find Selected Model in the settings and change it to the model you want to use, for example a model name you have already enabled in Mole API, such as gpt-5.4, or the model ID shown in the console.

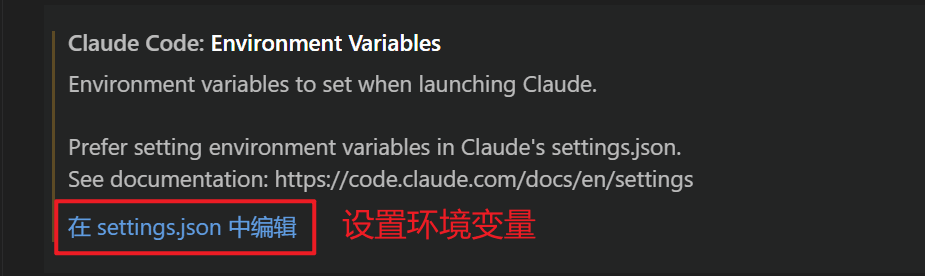
3. Configure Environment Variables in settings.json
Find Environment Variables in the settings. Click Edit in settings.json below it to open the user- or workspace-level settings.json file in VS Code.
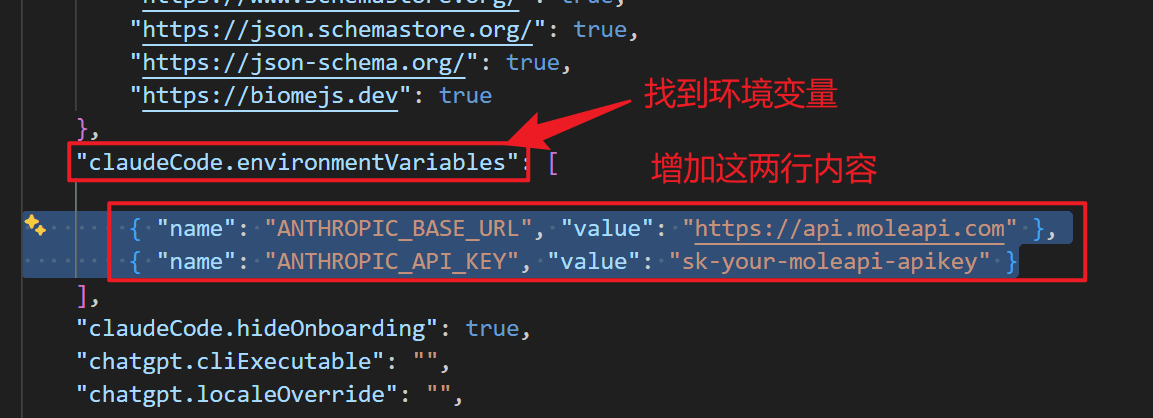
In settings.json, find claudeCode.environmentVariables. Add the following two lines to the array. If the setting does not exist, first add "claudeCode.environmentVariables": [], then insert these two entries into the array:
{ "name": "ANTHROPIC_BASE_URL", "value": "https://api.moleapi.com" },
{ "name": "ANTHROPIC_API_KEY", "value": "sk-your-moleapi-apikey" }
Replace sk-your-moleapi-apikey with the real API Key you obtained from the Mole API Console.
Then press Ctrl+S (or Cmd+S on macOS) to save the JSON, and close the Settings page.
Step 3: Open Claude Code and Verify It Works
- In VS Code, click the ✱ icon in the upper-right corner of the editor, click “✱ Claude Code” in the lower-right status bar, or open the Command Palette and search for Claude Code, then choose Open in New Tab or a similar option to open the Claude Code extension.
- If no login prompt appears, send any message in the input box, such as "Hello", and check whether you receive a normal response.
- If you receive a successful response, go to the request logs in the Mole API Console and verify that the model used matches the Selected Model you configured.
FAQ
The extension keeps asking me to log in
Make sure Hide Onboarding is enabled in settings, and confirm that ANTHROPIC_BASE_URL and ANTHROPIC_API_KEY have been added correctly under claudeCode.environmentVariables in settings.json. After saving, reopen the Claude Code panel or run Developer: Reload Window.
Request failed or returned 401
- Check whether ANTHROPIC_API_KEY matches the key in the Mole API Console exactly, including the
sk-prefix if applicable, and make sure it has not expired. - Confirm that ANTHROPIC_BASE_URL is set to
https://api.moleapi.comand that you did not append an extra path such as/v1.
I want to use the terminal version of Claude Code at the same time
Run claude in the VS Code integrated terminal. If you also want the terminal version to use Mole API, configure the same variables under env in ~/.claude/settings.json, or make sure the terminal session loads an environment that already includes those environment variables.
Reference Links
How is this guide?
Last updated on
Claude Code
Claude Code Tutorial — Connect Anthropic's terminal-based coding assistant to New API. Supports code understanding, multi-file editing, and integration with VS Code and JetBrains IDEs.
Codex Extension in VS Code
Install the Codex extension in VS Code and configure Mole API as the model provider to chat with Codex directly in the editor.